10 Best Blogger Templates of 2014

One of the most asked questions from our users is how to select an ideal Blogger Template. This is the reason why we thought it is necessary to have a section which could showcase a list of exclusive and high quality Blogger templates that are useful, and recommended for our users. Blogger is robust and has templates for almost any kind of website. This quality and a wide-range of designs is particularly the reason why designers prefer blogger as their online platform for business and blogging. In this article, we will show you a list of 10 Best Blogger Templates of 2014.

1. Brand Mag UX:


It is a sensational blogger template that is ideal for branding and design. It could be used as either Portfilio or a Professional magazine based site. It has all the core elements that a blogger template requires. Comes up with custom and highly professional widgets. All you need to do is to sit back and publish new articles.

2. Red Hood Portfolio:

It is probably the best Portfolio Blogger template. It has some of the most dominating feature that could ever be seen in the 1 page blogger template. It has, image sliders, logo sliders, RSS subscription, related posts and other useful plugins incorporated.

3. Momento:

It is ideal for music niche bloggers. With a big image slider, it comes up with another quality widgets like featured posts on the home page and etc. It has a dark color scheme with flexible enough features to be incorporated in any kind of website.

4. Focus: 

 
It is a personal blog theme, but it can be converted into a complete magazine theme because of its robust features. It is a premium theme from Themeforest, so the satisfaction is certain that it would be at least of pure quality.

5. Flat News:

 
Highest selling Blogger templates on Themeforest is among the most dominating Paid or Premium blogger templates. It has a simple interface that might be the reason it has dominated the premium themes otherwise its features can easily be seen on any FREE Theme.

6. GoMag:

 
It is a news and magazine style blogger template that is fully responsive and drag-drop homepage design. With user friendly interface it has multiple color schemes. It’s a compact theme with all necessary features.

7. BPress:


Another Premium theme from Themeforest, with almost identical features. BPress has amazing homepage layouts with multiple feature posts areas that provides enough flexibility to users to customize the home page according to their needs.

8. Metrofy


A responsive and user friendly metro based blogger template. It is clean and simple. It might not be packed with tons of features but certainly has an elegant style to be ranked at the 8 spot on our list.

9. FlatMag:

 
Based on FLAT UI, FlatMag is a high quality and responsive blogger template build by our sister site Templateism. It has flexible homepage, related posts, featured posts, multiple color scheme and other quality features. Moreover, it has perfect SEO score than other themes in the list.

10. Coopret:

 
Coopret, is a responsive blogger template that has produced features. Comes with multiple color schemes, it supports Blogger template designer through which you can customize its color according to the desire needs. With all features, it is ranked at the last spot.

We hope this list would help you to select the best blogger templates of 2014. Do let us know what are your thoughts about this list. In case we have miss out any best blogger template then do let us know by commenting is name below. Let us have a meaningful conversation. 

Add/Remove page/Post View Counter Widget For Blogger


Most of you are always thinking of a way to track that how many times is your posts or articles on your blog are viewed. Blogger a major free blog hosting provider does not have a individual post views counter widget like other blogging platforms, wordpress have. This is new improved version must work smoothly for all blogger blogs.


Features Added
  • New code makes Faster loading
  • Post views shown as image rather than text
  • You can show counter on Homepage too.
  • No ads at all. Advert Free.


How To install individual Page views counter widget for Blogger ??

Step#1 Log into your Blogger dashboard. Go to layout and than click on edit/html

Now check on expand widget content , than find the bellow code

<div class='post-header-line-1'>
and paste the bellow code after the above line


<b:if cond='data:blog.pageType == &quot;item&quot;'><img height='16' src='http://forums.bit-tech.net/images-light/misc/stats.gif' width='16'/><img alt='counter' expr:src='&quot;http://demo.bloggerwidgets.cz.cc/counter.php?page=&quot; + data:post.id + &quot;&amp;digit=4&quot;'/> <b>Views</b><b:else/><img height='16' src='http://forums.bit-tech.net/images-light/misc/stats.gif' width='16'/><img alt='counter' expr:src='&quot;http://demo.bloggerwidgets.cz.cc/counter2.php?page=&quot; + data:post.id + &quot;&amp;digit=4&quot;'/> <b>Views</b></b:if>

Now click Save Template

Create Separate Contact Page in Blogger

Blogger launched it’s official version of the Contact Form Widget but, it works only on the Blogger Sidebar. If you don’t want to add the contact form to your Blog’s sidebar but want it to appear on a specific page, then this tutorial will help you out. I didn’t want the contact form to appear every where on my blog. So I have moved it to a separate Contact Me Page

How to move the Blogger Contact Form to a separate Page

Follow the below steps to move the Contact Form to a separate page. If you would like to see a demo, you can check out my Contact page.
  1. First, add the Blogger Contact Form Widget to your sidebar. (We will hide the contact form later in this tutorial, but you have to add it) . My previous tutorial on adding a blogger contact form widget will help you out.
  2. Now create a new page in your blogcreate-new-page-in-blogger
  3. Copy the below contact form code block
    <form name='contact-form'>
    <div>Your Name : </div>
    <input class='contact-form-name' id='ContactForm1_contact-form-name' name='name' size='30' type='text' value=''/>
    <div>Your Email: <em>(required)</em></div>
    <input class='contact-form-email' id='ContactForm1_contact-form-email' name='email' size='30' type='text' value=''/>
    <div>Your Message: <em>(required)</em></div>
    <textarea class='contact-form-email-message' id='ContactForm1_contact-form-email-message' name='email-message' rows='5'></textarea>
    <p></p>
    <input class='contact-form-button contact-form-button-submit' id='ContactForm1_contact-form-submit' type='button' value='Send'/>
    <div style='text-align: center; max-width: 450px; width: 100%'>
    <p class='contact-form-error-message' id='ContactForm1_contact-form-error-message'></p>
    <p class='contact-form-success-message' id='ContactForm1_contact-form-success-message'></p>
    </div>
    </form>
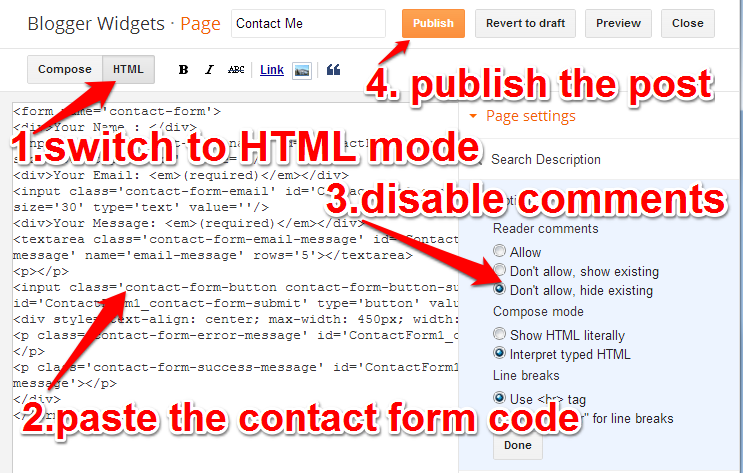
    While creating the Page, you have to switch to the HTML mode as shown in the image below. Then paste the above code into the post editor, disable the comments and publish your page.
    blogger-comment-form-on-separate-page
  4. Now go to Template > Edit HTML
    blogger-edit-html
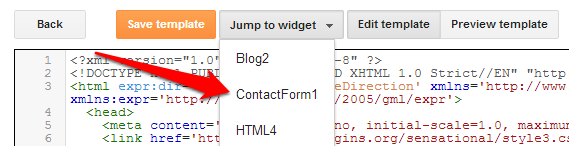
    and Jump to the ContactForm Code and expand with widget code
    jump-to-contact-form-widget
    expand-contact-form-widget
    and then expand the main b:includable
    expand-contact-form-widget-main-includable
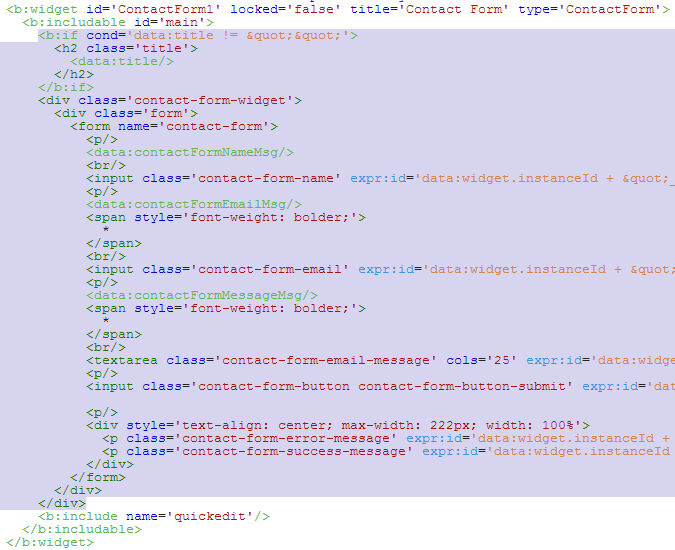
    Now delete the code highlighted below
    delete-bincludable-of-contact-form
    so that it ends up like
    contact-form-widget-should-look-like
    Now we have prevented the Contact Form Widget from appearing anywhere on the sidebar but have kept the widget registered.Make sure that you don't remove the widget from the Layout Page.
  5. Save the Template and it’s done.You now have a separate contact page on your Blogger blog :-)

  6. Happy Blogging!

How to Change Blogger POST A COMMENT Message/Text/Style?

Change Post a Comment text from Blogger
You know Comments are the best way to interact or make a good contact with your blog visitors.I think you are all seen a message "Post a Comment" in the bottom of every post in your blog. Do you think it is not so good to see your blog visitors? Then here I am going to show you how to change "Post a Comment" text from that part and place interesting images there. Also I am giving some cool images link with this article. Lets see how to change this


  • Sign In  to Blogger Dashboard
  • Go to Template -> Edit HTML
  • Search (Ctrl+F) for the code marked Bold
<a expr:id='data:widget.instanceId + &quot;_comment-editor-toggle-link&quot;' href='javascript:void(0)'><data:postCommentMsg/></a>
  •  Search the next <data:postCommentMsg/> ,that code looks like the following
<h4 id='comment-post-message'><data:postCommentMsg/></h4>
  • replace  <data:postCommentMsg/> with the image code
  • Select the code of image you want from the following

Style 1

<img src="http://i.imgur.com/Qv18EaT.gif"/>

Style 2

<img src="http://i.imgur.com/hR5AoQv.jpg"/>

Style 3

<img src="http://i.imgur.com/542TClt.jpg"/>

Style 4

<img src="http://i.imgur.com/2RqqdBN.jpg"/>

Style 5

<img src="http://i.imgur.com/h0oIkzC.jpg"/>

Style 6

<img src="http://i.imgur.com/YbPOTnI.jpg"/>

Style 7

<img src="http://i.imgur.com/wRUQ2JN.jpg"/>

Style 8

<img src="http://i.imgur.com/b7gXQLd.jpg"/>

Style 9

<img src="http://i.imgur.com/TXqb5vI.jpg"/>


Style 10

<img src="http://i.imgur.com/Wu2M9sv.jpg/>

Style 11

<img src="http://i.imgur.com/rP7bUnN.jpg"/>


Style 12

<img src="http://i.imgur.com/ZcVbJRa.jpg"/>

  • Save Template

I hope this article will help you. If you got any doubt or Suggestions, please do comment

Article also Applicable for

How to Add Automatic Read More TRICK for Blogger Blogs

How to Add Automatic Read More HACK for Blogger Blogs
Read More button or jump link is used cut the full article into two pieces and First piece of Text and images display in the Homepage. When you create a post may be it includes long snippets and images that are too long, then what should you do? You have to add <!-- more --> or click on Jump link to separate. Here I am going to show you how to Automatically put read more to Blogger posts. In this Automatic read more hack everything is automatic and you need not bother about the too long length of posts.Let us see how to do it..


 Features are
  • You can also limit the length of post
  • Set the size of Image, height and width separately
  • Disable Image
  • Sign In to Blogger Dashboard
  • Go to Template -> Edit HTML
  • Find </head>
  • copy the following code above it
<script type='text/javascript'>
var thumbnail_mode = "no-float" ;
summary_noimg = 400;  /* Summary length if no image*/
summary_img = 300; /* Summary length with image*/
img_thumb_height = 200; /*Image Height*/
img_thumb_width = 200; /*Image Width*/
</script>
<script type='text/javascript' src='http://netoopscodes.googlecode.com/svn/branches/Js%20files/auto-readmore-blogger.js' ></script>
If you add CSS codes to style jump link in your blog, then See the Update
  • Then Find (Ctrl+F)  <data:post.body/> and replace it with the following code
  • If you find more than one <data:post.body/> replace all occurrences.
<b:if cond='data:blog.pageType == &quot;item&quot;'>
<data:post.body/>
<b:else/>
<b:if cond='data:blog.pageType == &quot;static_page&quot;'>
<data:post.body/>
<b:else/>
<div expr:id='&quot;summary&quot; + data:post.id'>
<data:post.body/>
</div>
<script type='text/javascript'>
createSummaryAndThumb(&quot;summary<data:post.id/>&quot;);
</script>
<div style='clear: both;'/>
<span class='rmlink' style='font-weight:bold;padding:5px;float:right;text-align:right;'><a expr:href='data:post.url' >Read more...</a></span><a href="http://netoopsblog.blogspot.com"><img src="https://blogger.googleusercontent.com/img/b/R29vZ2xl/AVvXsEjF5-CdZW4htqhZY3STJ7gnANMDyF-ZfFh8ZXZaYLN0mfSnta43wMfOP6o-RGLZGouZ9AlqBdbbINkPtWJN6FocCoPYQthPELwru8hv5uhAu6iJ8APJzGh3dYLLJ-MaoYBjwHz1aZIE4ZY/s1600/1x1juice.png"></a>
</b:if>
</b:if>
  •  Save Template.

UPDATE [17.08.2013]

     In the above code, only a simple link to the post shows in the homepage. If you want to style that link or did you add css codes to style the jumplink, then add the following code instead of the above.
    • Then Find (Ctrl+F)  <data:post.body/> and replace it with the following code
    • If you find more than one <data:post.body/> replace all occurrences.
    <b:if cond='data:blog.pageType == &quot;item&quot;'>
    <data:post.body/>
    <b:else/>
    <b:if cond='data:blog.pageType == &quot;static_page&quot;'>
    <data:post.body/>
    <b:else/>
    <div expr:id='&quot;summary&quot; + data:post.id'>
    <data:post.body/>
    </div>
    <script type='text/javascript'>
    createSummaryAndThumb(&quot;summary<data:post.id/>&quot;);
    </script>
    <div style='clear: both;'/>
    <div class='jump-link'><a expr:href='data:post.url' expr:title='data:post.title' >Read more...</a></div><a href="http://netoopsblog.blogspot.com"><img src="https://blogger.googleusercontent.com/img/b/R29vZ2xl/AVvXsEjF5-CdZW4htqhZY3STJ7gnANMDyF-ZfFh8ZXZaYLN0mfSnta43wMfOP6o-RGLZGouZ9AlqBdbbINkPtWJN6FocCoPYQthPELwru8hv5uhAu6iJ8APJzGh3dYLLJ-MaoYBjwHz1aZIE4ZY/s1600/1x1juice.png"></a>
    </b:if>
    </b:if>
    Congratulations, You have done the Hack to your Blog. I think you enjoyed this article.

    Related Posts Blogger Widget and LinkedWithIn for Blogger

    Related Posts Blogger Widget and LinkedWithIn for Blogger
    Related posts Widget, as the title says , this Widget will generate the list of related posts. this Widget can be added either in homepage (under each posts) or inside the post. By placing this related posts Widget, there is chance the spread the other posts to visitors and they may have a tendency to take that post from the list, it will reduce the bounce rate of your blog and will keep your visitors from suddenly quit from your blog. Let's see how to add related posts widget to Blogger


    Using LinkedWithIn Widget

    • It is very simple to add LinkedWithIn Widget
    • Go to LinkedWithIn website and follow the simple instructions
    • Give e-mail id, blog url, select platform as Blogger and select number of posts should be displayed.

     Add Related Posts Manually To Blogger

    •  Sign In to Blogger Dashboard
    • Go to Template -> Edit HTML
    • Find </head> 
    • Copy the below code above </head>

    <!--Related Posts with thumbnails Scripts Start-->
    <b:if cond='data:blog.pageType == &quot;item&quot;'> /* remove this */
    <style type='text/css'>
    #related-posts {
    float:center;
    text-transform:none;
    height:100%;
    min-height:100%;
    padding-top:5px;
    padding-left:5px;
    }

    #related-posts h2{
    font-size: 18px;
    letter-spacing: 2px;
    font-weight: bold;
    text-transform: none;
    color: #5D5D5D;
    font-family: Arial Narrow;
    margin-bottom: 0.75em;
    margin-top: 0em;
    padding-top: 0em;
    }
    #related-posts a{
    border-right: 1px dotted #DDDDDD;
    color:#5D5D5D;
    }
    #related-posts a:hover{
    color:black;
    background-color:#EDEDEF;
    }
    </style>
    <script type='text/javascript'>
    vardefaultnoimage="https://blogger.googleusercontent.com/img/b/R29vZ2xl/AVvXsEi2I8uh_isveDrb_2v_3dpu5F3W2QempzcpvNq_i57j8RUQhTfl1LZ4qI9ZTi1q1VwM69So_AZXJLqqEPe-mz9RaYEY-I9NdMn-n6lWF9mvLKOwUgj2X4cJLyXlNtflj2-zcneztwwjs_o/s400/noimage.png";
    var maxresults=5;
    var splittercolor="#DDDDDD";
    var relatedpoststitle="Related Posts";
    </script><a href="http://netoopsblog.blogspot.com" style="font-size:0pt">Blogger Widgets</a>
    <script src='http://netoopscodes.googlecode.com/svn/netoops-related-posts-with-thumbnails-blogger.js' type='text/javascript'/>
    </b:if> /* remove this */
    <!--Related Posts with thumbnails Script End-->

    Customization

    • RED marked - remove red marked portion to add this Widget to Homepage
    • Brown - place the URL of the image in quotes to display if there is no image in the post.
    • maxresults=5 - change the value to change the number of posts to be displayed.
    • splittercolor="#DDDDDD" - change the color of splitter line between posts. Check here to seecolor codes selector
    • relatedpoststitle="Related Posts" - Change the Name of title.

     Add To Post Footer

    •  Find <div class='post-footer'> and copy the below code above it
    <b:if cond='data:blog.pageType == &quot;item&quot;'>
    <div id='related-posts'>
    <b:loop values='data:post.labels' var='label'>
    <b:if cond='data:label.isLast != &quot;true&quot;'>
    </b:if>
    <script expr:src='&quot;/feeds/posts/default/-/&quot; + data:label.name + &quot;?alt=json-in-script&amp;callback=related_results_labels_thumbs&amp;max-results=6&quot;' type='text/javascript'/></b:loop>
    <script type='text/javascript'>
    removeRelatedDuplicates_thumbs();
    printRelatedLabels_thumbs(&quot;<data:post.url/>&quot;);
    </script>
    </div><div style='clear:both'/>
    </b:if>
    <b:if cond='data:blog.url == data:blog.homepageUrl'><b:if cond='data:post.isFirstPost'>
    <a href='http://netoopsblog.blogspot.com'><img alt='Blogger Widgets' src='https://blogger.googleusercontent.com/img/b/R29vZ2xl/AVvXsEjF5-CdZW4htqhZY3STJ7gnANMDyF-ZfFh8ZXZaYLN0mfSnta43wMfOP6o-RGLZGouZ9AlqBdbbINkPtWJN6FocCoPYQthPELwru8hv5uhAu6iJ8APJzGh3dYLLJ-MaoYBjwHz1aZIE4ZY/s1600/1x1juice.png'/></a>
    </b:if></b:if>
      • Remove Orange marked to add related posts to homepage too.
      • Change RED marked to change the number of posts should be displayed
      I hope this article will help you. If so please like and share our blog