Get Dofollow Backlinks from Google Plus (Google+)

In The World of SEO, Backlinks are very Important. But Dofollow backlinks plays a very important role. Everybody Knows Google+ (Google plus) Is a Social Networking Website by Google and It's become Popular day by day. And I would like to tell you that Google plus is PR9. As Everybody wants Dofollow Backlinks from Google I was trying to get a Dofollow backlink from Google Plus and succeeded today.
Google Plus Dofollow
Google plus provides dofollow Backlinks. The Dofollow Link from Google+ help you to get Indexed fast, SERP and get High PR. I would like to share this with You "How to Get Dofollow Backlinks from Google Plus". Please read carefully and follow some simple steps to get Dofollow Backlinks from Google+.

#Step 1.

Log in to Your Google+ account and Go to 'Profile' and Click on 'About' as shown in the Image below.
Google Plus - Profile

#Step 2.

On the About page, scroll down gently and locate 'Story'.

#Step 3.

Now in 'Story' click on 'Edit'.

#Step 4.

Now a Popup will be open then under 'Introduction' section introduce yourself and insert few links and Click on Save.
Google Plus - About

#Step 5.

You Are Done! Your Dofollow Backlinks from Google Plus are ready.
Please note that it is only way to get Dofollow Backlinks from Google+ the backlinks from 'Links' section remains nofollow. Now What you think Is it difficult to get Dofollow Backlinks from Google? I think not. I hope that you will like this post and feel free to share this.

Smooth Scrolling Back To Top Button For Blogger Blog

Back to top button is the important part of navigation. In this tutorial i will share a awesome jQuery smooth scrolling back to top button. The best thing about this Back To Top Buttonis that it appears on the right side bottom beside the scroll down of the browser only when the user scrolls down the page and disappears as he scrolls up. Easy to load because it only made with html and css it doesn't have any image.
Back to Top
Adding this Back To Top Button in blogger blog is very simple you just need to follow this step by step guide.

#Step 1.

Log in to Blogger dashboard and select your blog and Now Navigate to Layout section and click on Add a Gadget

#Step 2.

After click on Add a Gadget a popup will be open then scroll down and find theHTML/JavaScriptAdd then click on Add on right side as shown in the image below.
Add a Widget

#Step 3.

Now this popup will be reload, you will see to two input Fields 1st for Title and 2nd forContent, dont need to fill Title field only past the below code in Content field.
<script src="http://ajax.googleapis.com/ajax/libs/jquery/2.0.0/jquery.min.js"></script>
<script>
jQuery(document).ready(function() {
var offset = 220;
var duration = 500;
jQuery(window).scroll(function() {
if (jQuery(this).scrollTop() > offset) {
jQuery('.back-to-top').fadeIn(duration);
} else {
jQuery('.back-to-top').fadeOut(duration);
}
});

jQuery('.back-to-top').click(function(event) {
event.preventDefault();
jQuery('html, body').animate({scrollTop: 0}, duration);
return false;
})
});
</script>

<style>
div#page {
max-width: 900px;
margin-left: auto;
margin-right: auto;
padding: 20px;
}

.back-to-top {
position: fixed;
bottom: 2em;
right: 0px;
text-decoration: none;
color: #000000;
background-color: rgba(235, 235, 235, 0.80);
font-size: 12px;
padding: 1em;
display: none;
}

.back-to-top:hover {
background-color: rgba(135, 135, 135, 0.50);
text-decoration: none;
}
</style>

<a href="#" class="back-to-top">Back to Top</a>

#Step 5.

Now Click on Save Button. and You'r Done!

#Important.

Back To Top Button with smooth scrolling is working properly i have tested this. This Scroll to Top Buttons is easy to install because you don't need to add this under template. If you need any help feel free to ask just Leave a comment, I would be happy to hear from you.

How To Embed PDF and other Documents In Blogger Blog Posts


One of our readers requested us to figure out how they can embed PDFs in their Blogger blog. There are many ways through which we can embed PDFs or other documents like Microsoft Word, Spreadsheets, PowerPoint Slides, and Excel Spreadsheets into our Blogger Blog. However, Google Docs is probably the most authentic and reliable way of embedding the PDF documents in a website. Therefore, today in this article, we will show you How to Embed PDFs or any other documents in Blogger Blog Posts.

First, go to https://drive.google.com and Sign in into your Gmail or Google account so that you have the admin privilege to the documents that would upload from your system hard drive. 

After signing in to your Google account, the next thing is to upload a PDF file from your system hard drive. On pressing the upload icon from the left side panel a drop down menu will pop out which would consist of two options i.e. File and Folder. Just select “File” and head to the next step.
Now it will inquire you to select the PDF (document) that you want to embed on your website. Now press the open button and move to the next step.
On pressing the open button a small upload wizard would appear on the right side of your screen. It usually takes a minute or two to upload, but it entirely depends upon the size of your file and the speed of your internet connection.
Once uploading is finished, click on the file name and it will take you to a new page. Before, you can embed the document you have to change the permission of the file to the public. Thus, select the share button displaying at the top right corner of your screen and change the permission of the file from private to open. 
Press change, and select “public on the web” so anyone on the Internet can find and access. No sign-in required. Finally, press the Save button to conclude the wizard. For detailed instructions, check out the following screenshot.
After changing the permission settings, now it’s time to grab the embed code. From the quick access tool bar select File >> Embed this PDF file. Now a new window will appear which would provide you the Embed code, copy the whole code and proceed to the next step.
After copying the code go to Blogger.com >> Create a new Post >> Select HTML Tab, and paste the code where you would like to see the document to appear. Now within the code that you pasted few moments a go search for /preview and replace it with /edit?usp=sharing. Now publish your article, and that’s it. See the following screenshot.
Be default the width of the document is set to 640 pixels while the height is set to 480 pixels. You can reduce the width and height according to your needs. You should now see a PDF attached to your blog posts along with some significant options like download and etc.

Visit/Hit counter for individual posts of blogger blog


Instructions To no Follow:
STEP #1
Log in to Blogger, go to Layout -> Edit HTML
and mark the tick box "Expand Widget Templates"

STEP #2
Now find (CTRL+F) this code in the template:
<div class='post-header-line-1'/>
And immediately after it, paste this code:

<b:if cond='data:blog.pageType == &quot;item&quot;'> <div id='hit-counter'> &lt;a href=&#39;&#39; rel=&#39;no follow&#39;&gt; <script src='http://nirav07.ulmb.com/counter.php' type='text/javascript'/> Times Visited &lt;/a&gt; </div></b:if>

You can change red text to - Viewed / Visits etc.


Now click Save Template

Add/Remove page/Post View Counter Widget For Blogger


Most of you are always thinking of a way to track that how many times is your posts or articles on your blog are viewed. Blogger a major free blog hosting provider does not have a individual post views counter widget like other blogging platforms, wordpress have. This is new improved version must work smoothly for all blogger blogs.


Features Added
  • New code makes Faster loading
  • Post views shown as image rather than text
  • You can show counter on Homepage too.
  • No ads at all. Advert Free.


How To install individual Page views counter widget for Blogger ??

Step#1 Log into your Blogger dashboard. Go to layout and than click on edit/html

Now check on expand widget content , than find the bellow code

<div class='post-header-line-1'>
and paste the bellow code after the above line


<b:if cond='data:blog.pageType == &quot;item&quot;'><img height='16' src='http://forums.bit-tech.net/images-light/misc/stats.gif' width='16'/><img alt='counter' expr:src='&quot;http://demo.bloggerwidgets.cz.cc/counter.php?page=&quot; + data:post.id + &quot;&amp;digit=4&quot;'/> <b>Views</b><b:else/><img height='16' src='http://forums.bit-tech.net/images-light/misc/stats.gif' width='16'/><img alt='counter' expr:src='&quot;http://demo.bloggerwidgets.cz.cc/counter2.php?page=&quot; + data:post.id + &quot;&amp;digit=4&quot;'/> <b>Views</b></b:if>

Now click Save Template

Create Separate Contact Page in Blogger

Blogger launched it’s official version of the Contact Form Widget but, it works only on the Blogger Sidebar. If you don’t want to add the contact form to your Blog’s sidebar but want it to appear on a specific page, then this tutorial will help you out. I didn’t want the contact form to appear every where on my blog. So I have moved it to a separate Contact Me Page

How to move the Blogger Contact Form to a separate Page

Follow the below steps to move the Contact Form to a separate page. If you would like to see a demo, you can check out my Contact page.
  1. First, add the Blogger Contact Form Widget to your sidebar. (We will hide the contact form later in this tutorial, but you have to add it) . My previous tutorial on adding a blogger contact form widget will help you out.
  2. Now create a new page in your blogcreate-new-page-in-blogger
  3. Copy the below contact form code block
    <form name='contact-form'>
    <div>Your Name : </div>
    <input class='contact-form-name' id='ContactForm1_contact-form-name' name='name' size='30' type='text' value=''/>
    <div>Your Email: <em>(required)</em></div>
    <input class='contact-form-email' id='ContactForm1_contact-form-email' name='email' size='30' type='text' value=''/>
    <div>Your Message: <em>(required)</em></div>
    <textarea class='contact-form-email-message' id='ContactForm1_contact-form-email-message' name='email-message' rows='5'></textarea>
    <p></p>
    <input class='contact-form-button contact-form-button-submit' id='ContactForm1_contact-form-submit' type='button' value='Send'/>
    <div style='text-align: center; max-width: 450px; width: 100%'>
    <p class='contact-form-error-message' id='ContactForm1_contact-form-error-message'></p>
    <p class='contact-form-success-message' id='ContactForm1_contact-form-success-message'></p>
    </div>
    </form>
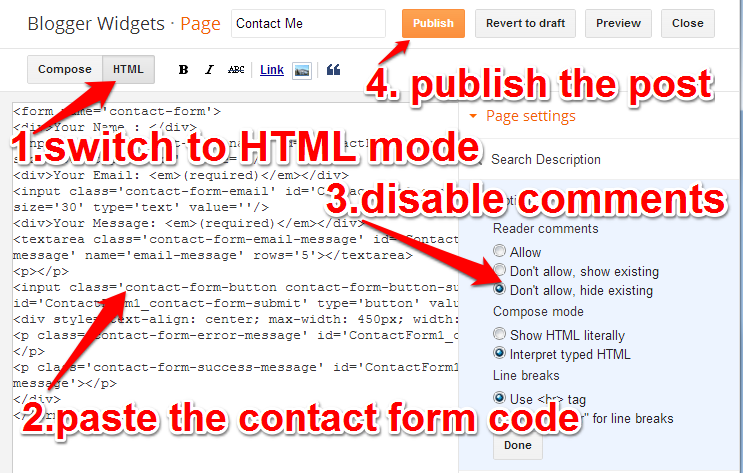
    While creating the Page, you have to switch to the HTML mode as shown in the image below. Then paste the above code into the post editor, disable the comments and publish your page.
    blogger-comment-form-on-separate-page
  4. Now go to Template > Edit HTML
    blogger-edit-html
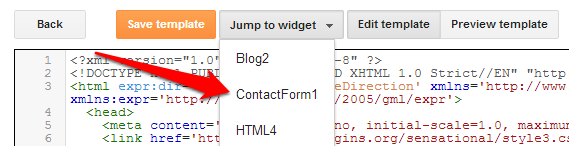
    and Jump to the ContactForm Code and expand with widget code
    jump-to-contact-form-widget
    expand-contact-form-widget
    and then expand the main b:includable
    expand-contact-form-widget-main-includable
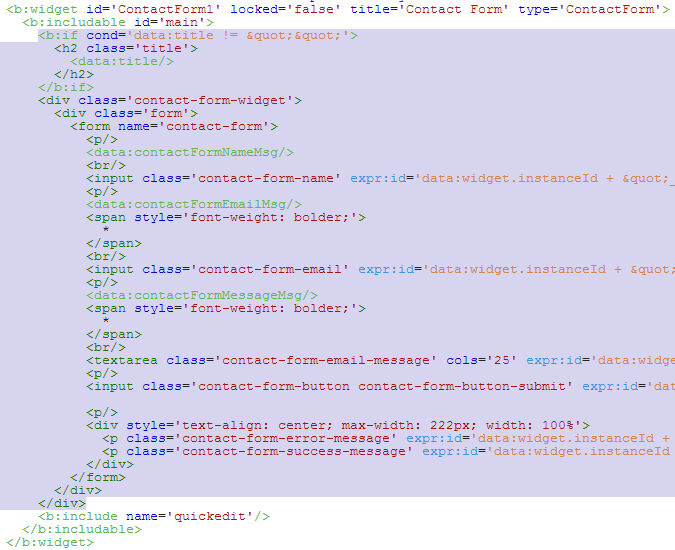
    Now delete the code highlighted below
    delete-bincludable-of-contact-form
    so that it ends up like
    contact-form-widget-should-look-like
    Now we have prevented the Contact Form Widget from appearing anywhere on the sidebar but have kept the widget registered.Make sure that you don't remove the widget from the Layout Page.
  5. Save the Template and it’s done.You now have a separate contact page on your Blogger blog :-)

  6. Happy Blogging!

Adding Basic Captcha Protection on your Shopify Blog

Hey all!
If you run a blog, you know that SpamBots can be the bane of any blog's existence. We have an awesome workaround you can implement in about 5 minutes that will add basic captcha protection to all of your blog posts!
1) Go to article.liquid under Themes > Template Editor


2) Add this code to the very top of the file, starting on line 1:
<script type="text/javascript">
$(document).ready(function() {
var n1 = Math.round(Math.random() * 10 + 1);
var n2 = Math.round(Math.random() * 10 + 1);
$("#question").val(n1 + " + " + n2);
$(".comment-form").submit(function (e) {
if (eval($("#question").val()) != $("#answer").val()) {
$("#answer").css('box-shadow', '0px 0px 7px red');
e.preventDefault();
}
});
});
</script>
It should look like this:
3) Add the following code in the form at the end, but before the submit button (default is line 88):
<div>
<br/>How much is: <input type="text" disabled="disabled" id="question"/>
<br/>Answer:* <input type="text" id="answer"/>
</div>
Make sure you save your changes, and the finished product will look like this:

Happy blogging, everyone! :)

How to Change Blogger POST A COMMENT Message/Text/Style?

Change Post a Comment text from Blogger
You know Comments are the best way to interact or make a good contact with your blog visitors.I think you are all seen a message "Post a Comment" in the bottom of every post in your blog. Do you think it is not so good to see your blog visitors? Then here I am going to show you how to change "Post a Comment" text from that part and place interesting images there. Also I am giving some cool images link with this article. Lets see how to change this


  • Sign In  to Blogger Dashboard
  • Go to Template -> Edit HTML
  • Search (Ctrl+F) for the code marked Bold
<a expr:id='data:widget.instanceId + &quot;_comment-editor-toggle-link&quot;' href='javascript:void(0)'><data:postCommentMsg/></a>
  •  Search the next <data:postCommentMsg/> ,that code looks like the following
<h4 id='comment-post-message'><data:postCommentMsg/></h4>
  • replace  <data:postCommentMsg/> with the image code
  • Select the code of image you want from the following

Style 1

<img src="http://i.imgur.com/Qv18EaT.gif"/>

Style 2

<img src="http://i.imgur.com/hR5AoQv.jpg"/>

Style 3

<img src="http://i.imgur.com/542TClt.jpg"/>

Style 4

<img src="http://i.imgur.com/2RqqdBN.jpg"/>

Style 5

<img src="http://i.imgur.com/h0oIkzC.jpg"/>

Style 6

<img src="http://i.imgur.com/YbPOTnI.jpg"/>

Style 7

<img src="http://i.imgur.com/wRUQ2JN.jpg"/>

Style 8

<img src="http://i.imgur.com/b7gXQLd.jpg"/>

Style 9

<img src="http://i.imgur.com/TXqb5vI.jpg"/>


Style 10

<img src="http://i.imgur.com/Wu2M9sv.jpg/>

Style 11

<img src="http://i.imgur.com/rP7bUnN.jpg"/>


Style 12

<img src="http://i.imgur.com/ZcVbJRa.jpg"/>

  • Save Template

I hope this article will help you. If you got any doubt or Suggestions, please do comment

Article also Applicable for